Installation
Overview
This document explains how IT teams can choose the best way to install the Scylla Video Analytics system.
Scylla can be installed on-premises (inside your own network) or in the cloud. For on-premises installations, Scylla runs on servers located inside a secure or air-gapped environment. These servers can be provided either by Scylla or by the customer, depending on the agreement.
The setup depends on things like how many cameras you have and how much processing power you need. There are no separate software packages for cloud and on-premises. The same software bundle is used for both. As long as system requirements are met, Scylla can run in a public cloud, private cloud, or local data center.
All Scylla services are delivered as container images, which makes installation and updates easier.
We use Kubernetes as the main system to manage these containers, and we strongly recommend using it.
Simpler tools like Docker Swarm or Docker Compose can also be used. However, if you want to use the Scylla Dashboard, you must use Kubernetes because the dashboard only works with Kubernetes.
Software Components
Full scale deployment consists of the following components:
- Software modules – AI analytics images - (one image is equal to one module, e.g. TFA is one container image)
- Operator / Admin dashboard – Web-based user interface
- Web service – Software and dashboard communication
- Database for web service – MongoDB
- Database for TFA – PostgreSQL
- Database for FR – Milvus
- In-memory database (for cache) – Redis
- Message Broker – RabbitMQ
Depending on the scale of the installation and the specific modules selected, the components may vary. For instance, Milvus DB and RabbitMQ are requisite only for the Face Recognition module, while PostgreSQL and Redis are necessary for Traffic Flow analytics. MongoDB serves as the primary database for the web dashboard and is required across all scenarios.
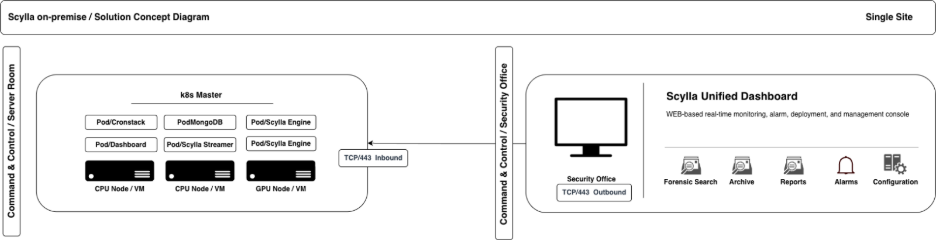
There are two primary architectures we have adopted: Single Node and Multi Node.
- Single Node
- Multi Node (also called multi-site)
In single-node installations, all components can operate on a single machine. However, in Multi Node installations, it is imperative to ensure that all databases are deployed on separate machines. Additionally, the Web Service and Dashboard should be isolated on their own machines. Notably, these components do not necessitate GPU resources and can function on regular servers. This approach is recommended for stable deployment.
A simple use case for Single Node installation is a small business with a few cameras.
Multi-node installations are more suitable for enterprises with dispersed geographic locations across the country or world. Selecting the appropriate architecture is crucial before commencing installation to mitigate scalability issues in the future.
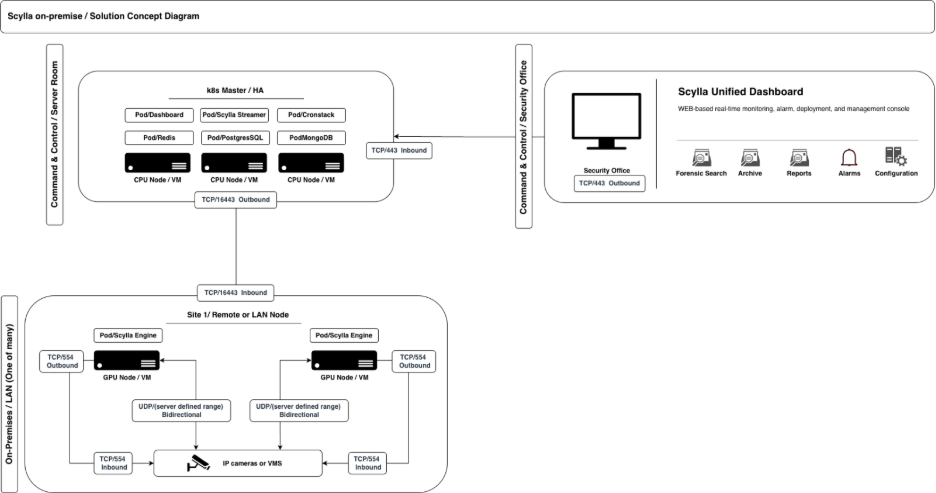
For multi-site / multi-node environments network connectivity is required bidirectional between all servers, if this is not possible then VPN solution may provide connectivity, we work with several p2p VPN providers, contact support to choose the best for your use case.
Choosing the right architecture is vital before starting installation to avoid scalability issues later.
The video analytics software requires a GPU-powered server for efficient execution of operations. Any Nvidia server-grade GPU is suitable for this purpose, including gaming cards. Prior to selecting a GPU, the deployment team or customer must ensure that the device is supported by Nvidia.
More about hardware requirements: https://www.scylla.ai/ai-appliance-hardware-calculator
All components of the software are containerized, including all Scylla services, modules, and databases such as MongoDB, PostgreSQL, and Milvus. Bitnami charts are utilized to deploy databases, although managed databases may also be chosen for cloud deployments.
Helm charts are employed to deploy workloads for both Scylla containers and supporting services and databases.
Hardware Prerequisites
- Industry-standard Nvidia GPU powered server(s) / workstations
- Ethernet switch ports, preferably two (an additional one for failover reasons)
- Power sockets, preferably two (an additional one for failover)
- Access to the VMS (Video Management System) system through RTSP protocol or directly with cameras (default port IPv4 554)
- Access to the Server from the Security office or Command Control Center for Scylla dashboard (default port 80 and 443 (if TLS is configured))
- Two Cat6 or Cat6a ethernet cables for network cards (depending on the server we may require fibers)
- IT support personnel with a knowledge of hardware and networking.
- Fast Internet access for the server to download software images and updates.
- Reliable, Fast and Secure VPN (or similar) Remote access for tech support, updates and patches
- CPU with AVX support, MongoDB requires that
- Secure Boot in BIOS must be disabled, to ensure proper loading of NVIDIA drivers.
Disk Partitioning Guidelines
- When installing the OS, follow the instructions below to properly configure stirage
- Create a single large root volume using the maximum available disk space.
- Include only the required EFI partition for boot.
- Do not create additional or unused partitions.
- If a second disk is present, partition it using the same approach but do not mount it yet. It will be configured and mounted later.
Software Prerequisites
- Operating System Ubuntu 22.04
Network Configuration Guidelines
- Use static IP addresses whenever possible.
- For multi-node clusters, static IPs are mandatory to ensure reliable communication between servers
- For single-node clusters, static IPs are strongly recommended.
- If the environment includes custom network setups (e.g., iptables rules, firewalls, local DNS),
- coordinate with Scylla support to ensure compatibility.
- In multi-cluster setups, ensure all clusters can reach each other over the local network.
Access Credentials
- Share sudo/root credentials for the Ubuntu (ScyllaGPU) server.
- Provide camera credentials in Excel or CSV format including columns: IP, Username, and Password.
Installation Methods
Remote - Online Installation
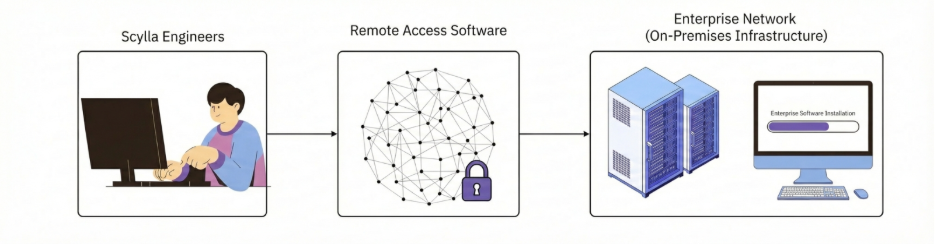
- The server must have a local network interface and active Internet access.
- Port 443/TCP must be open to download necessary packages and tools.
- Install TeamViewer prior to installation or provide SSH access for a user with sudo privileges.
Remote - Offline/Air-Gapped Installation
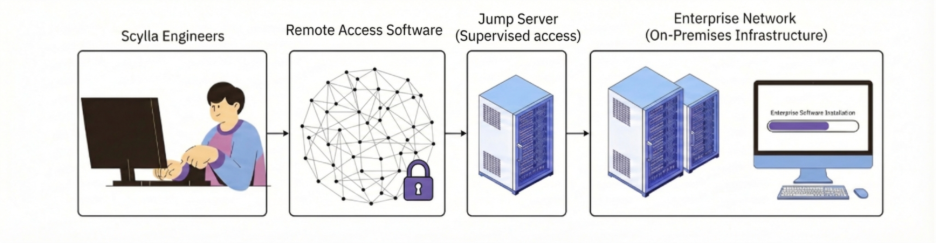
- For offline or air-gapped environments, access to the Scylla server must be provided through a jump server.
- The jump server can be Windows or Linux.
- Install TeamViewer on the jump server or ensure VPN connectivity.
- Verify that the jump server can connect to the Scylla server via SSH.
- The jump server must have Internet access to download required packages and tools.
- Scylla can operate fully regardless of whether it was installed online or offline.
- You can disconnect or reconnect the Scylla server to the Internet at any time without affecting functionality.
- Cloud-based features require the server to maintain an active Internet connection.
DIY (Do it yourself)
In this scenario, your servers must have internet access during the installation so the script can download all packages and dependencies, once installation is done, internet can be disabled. Follow the guide below to install the software on your own.
Installation
The following environment variables must be exported before running the installation script. Variables not set explicitly will use default values.
Required Variables
| Variable Name | Default Value | Possible Values | Description |
|---|---|---|---|
| SCYLLA_DASHBOARD_VERSION | "none" | v2.39.17 | Version of the SCYLLA Dashboard to deploy. |
| SCYLLA_CRONSTACK_VERSION | "none" | v1.8.35 | Version of the cron-based job stack to deploy. |
| SCYLLA_KUBERNETES_ENGINE | "none" | "k3s" or "microk8s" | Kubernetes engine to use |
| SCYLLA_CUSTOMER_NAME | "none" | Any string | Identifier for the customer or environment. |
| SCYLLA_TELE_LABEL_OWNER | "none" | Any string | Label for Teleport and telemetry tagging. |
Optional Variables
| Variable Name | Default Value | Possible Values | Description |
|---|---|---|---|
| SCYLLA_DEBUG_ENABLED | 0 | 0 or 1 | Enables debug mode with verbose output. |
| SCYLLA_NONINTERACTIVE | 0 | 0 or 1 | Run in non-interactive if 1. |
| SCYLLA_DATA_DISK | "none" | /dev/nvme1n1 | Disk device used for data storage |
| SCYLLA_MASTER_NO_GPU | 0 | 0 or 1 or 2 | To disable GPU-specific components on the master node set to 1. Set to 2 to enable only microk8s gpu plugin without installing nvidia drivers |
| SCYLLA_GPU_VERSION | 535 | 535 or 550 or 570 | NVIDIA GPU driver version to install. |
| SCYLLA_AWS_SSM\ | 1 | 0 or 1 | If your instance is in AWS, set this variable to 0 to avoid conflicts with roles and permissions. |
| SCYLLA_CUSTOM_DNS | none | 8.8.8.8 | Custom DNS server |
| SCYLLA_TWINGATE_INSTALL | 1 | 0 or 1 | Installs Twingate for secure networking if set to 1. |
| SCYLLA_TELEPORT_INSTALL | 1 | 0 or 1 | Installs Teleport for remote connection if set to 1. |
| SCYLLA_MICROK8S_VERSION | "1.31" | "1.29" or "1.31" | Version of MicroK8s to be installed. |
| SCYLLA_NFS_SERVER | 0 | 0 or 1 | When the FRP engine is enabled, set to 1 to use NFS storage for multi-node clusters, or 0 to use HostPath storage for single-node clusters. |
| SCYLLA_K3S_VERSION | "v1.32.6+k3s1" | "v1.32.6+k3s1" | Version of K3s to be installed. |
| SCYLLA_AI_ENGINES | "none" | aod,ids,ptd,rmd,tfa,frs,fds,sfds,snfds,tds,lpr,vds,frp,vit | Comma-separated AI engines to be installed |
| SCYLLA_HELM_VERSION | "latest from ECR" | "v1.1.24" | Scylla Helm chart version |
| SCYLLA_STREAMER_VERSION | "v2.15.0" | "v2.15.0" | Version of the real-time streaming component to deploy. |
| SCYLLA_AWS_ACCESS_KEY_ID | "none" | "valid aws key" | If AWS SSM hybrid activation will be disabled on this node, you can provide valid credentials by exporting these variables. |
| SCYLLA_AWS_SECRET_ACCESS_KEY | "none" | "valid aws secret key" | If AWS SSM hybrid activation will be disabled on this node, you can provide valid credentials by exporting these variables. |
Run the installation script
The installation script is encrypted; you will be prompted to enter a decryption key. You can obtain a key by contacting support@scylla.ai please provide your license key ID so support can identify you as a customer.
export SCYLLA_KUBERNETES_ENGINE="microk8s"
export SCYLLA_DASHBOARD_VERSION=v2.39.16
export SCYLLA_CRONSTACK_VERSION=v1.8.35
export SCYLLA_STREAMER_VERSION=v2.15.0
export SCYLLA_HELM_VERSION=v1.1.24
export SCYLLA_AI_ENGINES=frs,ids,ptd
export SCYLLA_GPU_VERSION=535
export SCYLLA_TWINGATE_INSTALL=1
export SCYLLA_CUSTOMER_NAME=Scylla-Demo
export SCYLLA_TELE_LABEL_OWNER=Scylla
Replace the values according to your specific environment needs.
Run the Installation Script Use the following command to run:
sudo -E bash -c "$(curl -fsSL https://enterprise.install.dev.scylla.site/scripts/install.sh)"
What This Example of Script Will Do
- Install a K3s Kubernetes cluster with the latest tested version for Scylla.
- Install all required dependencies.
- Enable Twingate integration.
- Deploy Scylla AI engines: ptd, frs, and ids.
Verify the installation
If everything is done correctly, you will see the following message on the terminal: Setup completed successfully.
To verify that the node is working as expected, run the following command and check that all pods are in the Running state and all jobs have Completed:
k get pods -A -o wide
If you have any questions, please do not hesitate to contact the DevOps team.
Add Worker Node (scale the installation)
On Master Node
This guide explains how to add a worker node to the existin cluster.
Before running the setup script, make sure to expose the worker node's IP address as an environment variable:
export SCYLLA_WORKER_IP_ADDRESS=192.168.XYZ.XYZ
To add a Jetson box as a worker node in a Kubernetes cluster, export the following variable.
You can add a Jetson as a worker only if you are using K3s as the Kubernetes engine.
export SCYLLA_WORKER_JETSON=1
Then run the following command:
sudo -E bash -c "$(curl -fsSL https://enterprise.install.dev.scylla.site/scripts/add.sh)"
You will be prompted to enter a passphrase during execution.
On Worker Node
Export the SCYLLA_GPU_VERSION variable with the appropriate hardware compatibility version on the worker node.
export SCYLLA_GPU_VERSION=XYZ
At the end of the script execution on the master node, a block of shell commands will be shown.
Copy and run that block on the worker node to complete the setup.
If the NVIDIA driver is already installed on the worker node, you can skip the driver reinstallation by running the following command
export SCYLLA_WORKER_NO_NVIDIA_DRIVER=1
Verify the Setup
If everything is done correctly, you will see the following message on the worker node: Worker setup completed successfully.
To verify the node has joined the cluster, run the following command on the master node:
k get nodes -o wide
You should see the new worker node listed along with the master node.
Upgrade Guide
This guide explains how to update an existing on-premises Kubernetes cluster using Helm.
Prerequisites
Ensure the following prerequisites are met before proceeding with the update:
- The latest Scylla Helm chart is already present on this server.
- The Helm Diff plugin is already installed and configured on this server to ensure safe updates.
Preparing Dependencies
First, request temporary AWS credentials from the DevOps team and configure them on your machine. Run the following command to authenticate and pull the Helm chart:
aws ecr get-login-password \
  --region us-east-2 --profile scylla | helm registry login \
  --username AWS \
  --password-stdin 102771688444.dkr.ecr.us-east-2.amazonaws.com
After successful login, pull the specified version of the Helm chart:
helm pull oci://102771688444.dkr.ecr.us-east-2.amazonaws.com/scylla --version v1.1.24
Downloading and Configuring the Helm Diff Plugin
helm plugin list
If the output shows the diff plugin, you can skip the installation.
Run the following Bash function to automatically install and configure the plugin:
install_helm_diff() {
  URL="https://scylla-public-files.s3.us-east-2.amazonaws.com/devops/files/helm-diff.tar.gz"
  LOCAL_TAR="$HOME/helm-diff.tar.gz"
  PLUGIN_DIR="$HOME/.local/share/helm/plugins"

  mkdir -p "$PLUGIN_DIR"
  wget -O "$LOCAL_TAR" "$URL"
  tar -xzf "$LOCAL_TAR" -C "$PLUGIN_DIR"
  rm -f "$LOCAL_TAR"

  if helm plugin list | grep -q "diff"; then
    echo "helm-diff plugin successfully installed"
  else
    echo "helm-diff plugin installation failed, please check logs"
  fi
}

install_helm_diff
Verify the plugin installation You can confirm that the plugin is installed by running the same command again:
helm plugin list
Now the output should include the diff plugin.
Updating the cluster
In this step, we will edit the existing Helm chart values with the necessary parameters and generate a diff file to preview the changes before performing the upgrade. If everything looks good, we will proceed with the cluster update in the next step.
First, retrieve the current values used in the Helm release with the following command:
helm get values scylla > old-values.yaml
This will save the existing Helm values into a file named old-values.yaml.
Open the old-values.yaml file in your preferred editor, make the required changes, then save and exit.
Generate the Diff File
Run the following command to simulate an upgrade and capture the output in a diff file:
helm diff upgrade scylla scylla-v1.1.24.tgz -f old-values.yaml > helmdiff
- scylla is the name of the Helm release.
- scylla-v1.1.24.tgz is the chart archive you downloaded from AWS ECR.
- old-values.yaml is the modified values file.
- helmdiff is the output file showing the simulated changes.
Open the helmdiff file in any text editor and carefully review what will be deleted and what will be created. A mistake at this step can be critical.
If everything in the helmdiff file looks good and matches your expectations, you can proceed to the next step.
If you've reached this step, it means you have successfully modified the values YAML file.
To perform the actual upgrade (not in dry-run mode), run the following command:
helm upgrade scylla scylla-v1.1.24.tgz -f old-values.yaml
This command will trigger the upgrade process. If everything goes smoothly, you will see a Helm banner indicating that the upgrade was successful.
If you encounter any error messages during this step, please inform the DevOps team immediately.
To verify the release status, use:
helm list -A
If the output shows that the scylla chart status is deployed and the version matches the one you specified, it means the installation was successfully completed.