Scylla FR with central dashboard on Hanwha AIB-800 & Scylla Asteria V8 - Installation Guide
Compatibility
| Device | Jetpack Version | Model Name | Full HD Streams | 3K Streams | 4K Streams |
|---|---|---|---|---|---|
| NVIDIA Jetson Orin NX 8GB | 6.0 only | AIB-800 | 6 | 5 | 4 |
| NVIDIA Jetson Orin Nano 8GB | 6.0 only | Scylla Asteria V8 | 5 | 4 | 3 |
Make sure both machines (Jetson and master node) are in the same network subnet, can freely talk to each other, and have static IP configured
Master Node Setup
OS: Ubuntu 22.04
Step 1: Open a root shell
sudo su
Step 2: Set required environment variables
export SCYLLA_KUBERNETES_ENGINE="k3s"
export SCYLLA_DASHBOARD_VERSION=v2.42.10
export SCYLLA_CRONSTACK_VERSION=v1.9.4
export SCYLLA_STREAMER_VERSION=v2.17.23
export SCYLLA_HELM_VERSION=v2.0.0
export SCYLLA_AI_ENGINES=frs
export SCYLLA_MASTER_NO_GPU=2
export SCYLLA_CUSTOMER_NAME=hanwha-vsion-us
export SCYLLA_TELE_LABEL_OWNER=HanwhaUS
Change SCYLLA_CUSTOMER_NAME and SCYLLA_TELE_LABEL_OWNER so later Scylla support can differentiate between many devices.
possible values for SCYLLA_CUSTOMER_NAME.
• Allowed: lowercase letters (a–z), numbers (0–9), hyphens (-)
• Avoid: uppercase, underscores (_), spaces, special symbols (@, #, etc.)"
Step 3: Run the installer
sudo -E bash -c "$(curl -fsSL https://enterprise.install.scylla.site/scripts/install.sh)"
You will be prompted to enter a passphrase during installation. Keep it safe — it will be required for future operations.
Connecting a Jetson Worker Node
After the master node installation completes, proceed with adding a Jetson device.
Step 1: On the Master Node
Set the worker configuration:
export SCYLLA_WORKER_JETSON=1
export SCYLLA_WORKER_IP_ADDRESS=192.168.XYZ.XYZ
Run the worker add script:
sudo -E bash -c "$(curl -fsSL https://enterprise.install.scylla.site/scripts/add.sh)"
📌 Step 2: On the Jetson Device
- The command above will output a set of commands
- Copy those commands
- Run them on the target Jetson (e.g Orin NX 8GB, Jetpack 6.0) The command above will output a set of commands
Copy those commands
Run them on the target Jetson (e.g Orin NX 8GB, Jetpack 6.0)
This will output a command which you need to copy and paste it into your master command line.
Verify the installation
- Master node running on central dashboard
- Jetson Orin NX registered as a worker node
- Scylla AI services deployed and ready Master node running on central dashboard
Jetson Orin NX registered as a worker node
Scylla AI services deployed and ready
On any client PC within the same network, type IP address of the central server to access the dashboard, e.g http://192.168.11.8. Default username: scylla-local-company, default password: Password1!
Central Dashboard
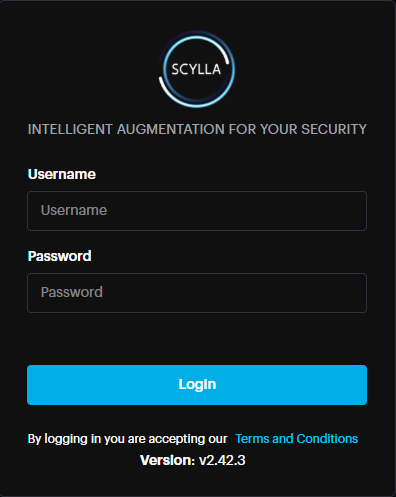
Step 1: Access the On-premises Central Dashboard
To use the Scylla On-Premises server, login to the dashboard. The Dashboard is accessible by typing the IP address of the server in your browser’s address bar.
If the user is already authenticated in the browser, the main Dashboard home page will appear.
If not logged in, enter your Username and Password into the corresponding fields and click the Login button.
After successfully logging in, you will be redirected to the Dashboard.
If you are not redirected to the Dashboard page, there are two possible reasons:
Please be attentive while entering your username and password into the fields. Make sure to have not copied any additional characters or left leading spaces.Example of leading spaces:Wrong: “ username” has leading spacesCorrect: “username” does not have any leading spaces.The “Invalid credentials” error message appears, either the username or password is incorrect.
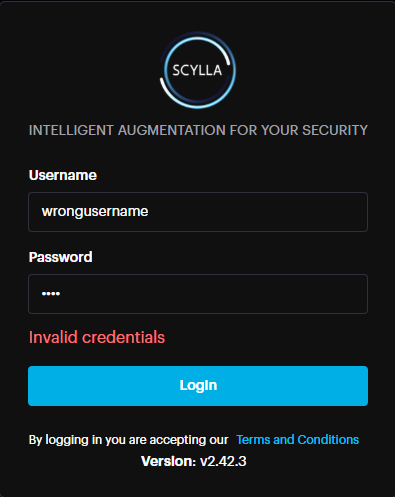
Double-check and reenter your credentials. If this message appears again, contact your administrator.
If authentication fails but there is no error message, it is recommended to clear the browser’s cache and try again. See this article for detailed instructions on how to clear any browser’s cache. In the even that clearing the cache does not solve the problem, please submit a request on the Help Center.
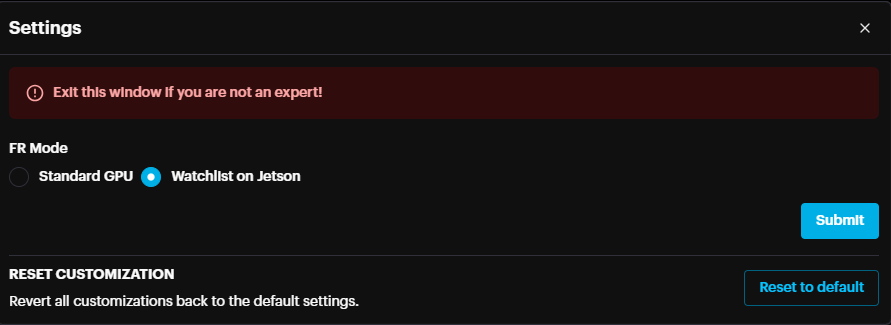
Step 2: Configuring Face Recognition (FR) Mode
- Open Settings: Press CTRL + SHIFT + S on your keyboard to launch the Settings window.
- Select FR Mode: Navigate to the mode selection menu and ensure that Watchlist on Jetson is selected as the active FR Mode.
- Click Submit Open Settings: Press CTRL + SHIFT + S on your keyboard to launch the Settings window.
Select FR Mode: Navigate to the mode selection menu and ensure that Watchlist on Jetson is selected as the active FR Mode.
Click Submit
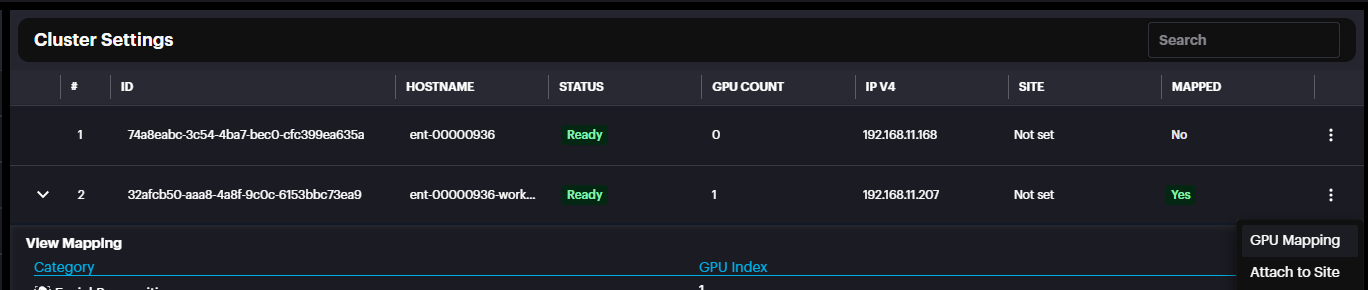
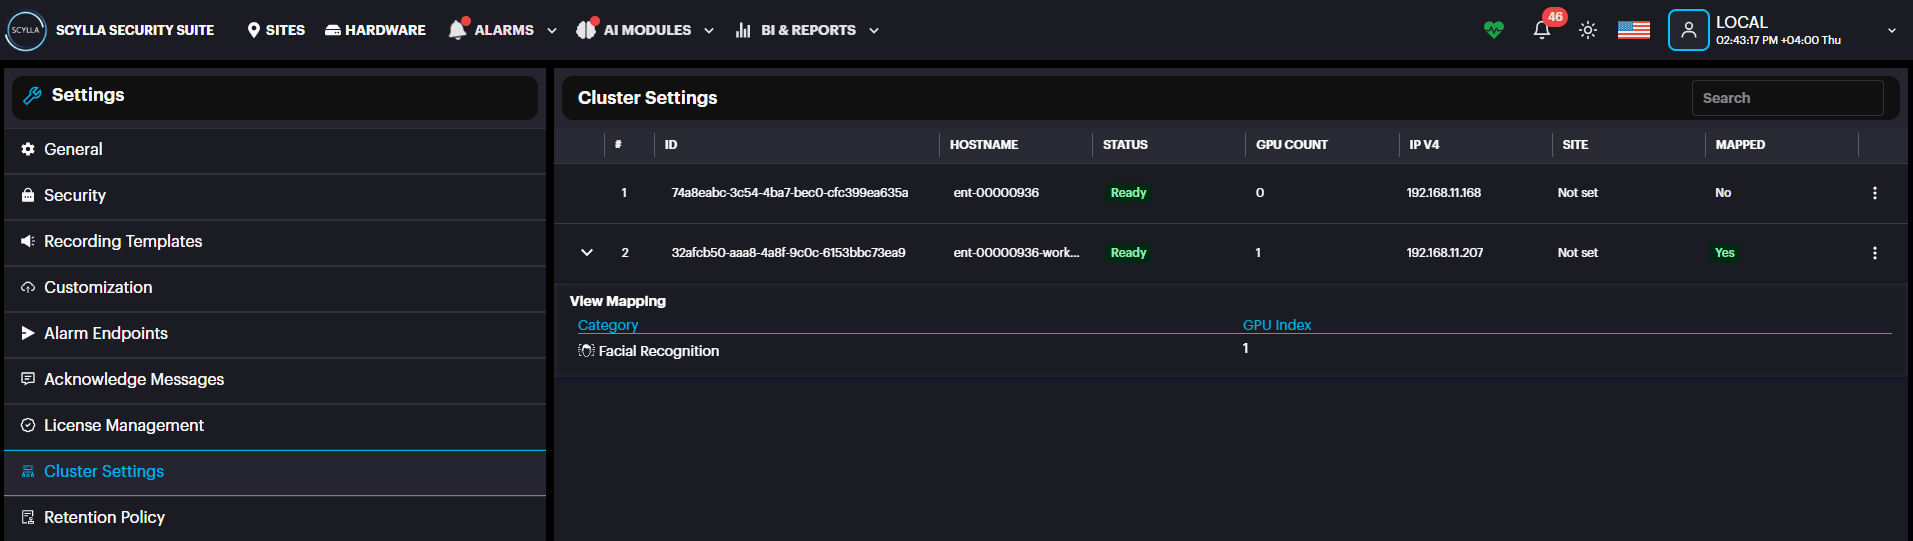
Step 3: Configuring Cluster Settings
- Access Cluster Settings: Navigate to the Account Menu, select Settings, and then click on Cluster Settings.
- Locate the Node: On this page, you will see a list of Central Server and Jetson node records. Locate the specific Jetson node you wish to configure.
- Open GPU Mapping: Click the More Options (three dots) icon next to the desired Jetson node and select GPU Mapping from the menu. Access Cluster Settings: Navigate to the Account Menu, select Settings, and then click on Cluster Settings.
Locate the Node: On this page, you will see a list of Central Server and Jetson node records. Locate the specific Jetson node you wish to configure.
Open GPU Mapping: Click the More Options (three dots) icon next to the desired Jetson node and select GPU Mapping from the menu.
- Map the Module: In the configuration window, ensure the Face Recognition module is mapped to the GPU. Click Submit. Map the Module: In the configuration window, ensure the Face Recognition module is mapped to the GPU. Click Submit.

- Expand Node Details: Locate the node record in the list and click the Expand icon () the left side of the entry to view the mappings. Expand Node Details: Locate the node record in the list and click the Expand icon () the left side of the entry to view the mappings.
Step 4: Deploying Cameras for Face Recognition
- Navigate to the Module: Go to the AI Modules menu and select Facial Recognition. Navigate to the Module: Go to the AI Modules menu and select Facial Recognition.

- Open Deployment Settings: Click on the Deployment icon to manage active camera tasks. Open Deployment Settings: Click on the Deployment icon to manage active camera tasks.

- Add a New Deployment: Click the Add Deployment button to begin the configuration process.
- Configure Parameters:
- Complete all required fields in the setup form.
- Select the specific camera(s) intended for face detection.
- Click Save. Add a New Deployment: Click the Add Deployment button to begin the configuration process.
Configure Parameters:
- Complete all required fields in the setup form.
- Select the specific camera(s) intended for face detection.
- Click Save. Complete all required fields in the setup form.
Select the specific camera(s) intended for face detection.
Click Save.
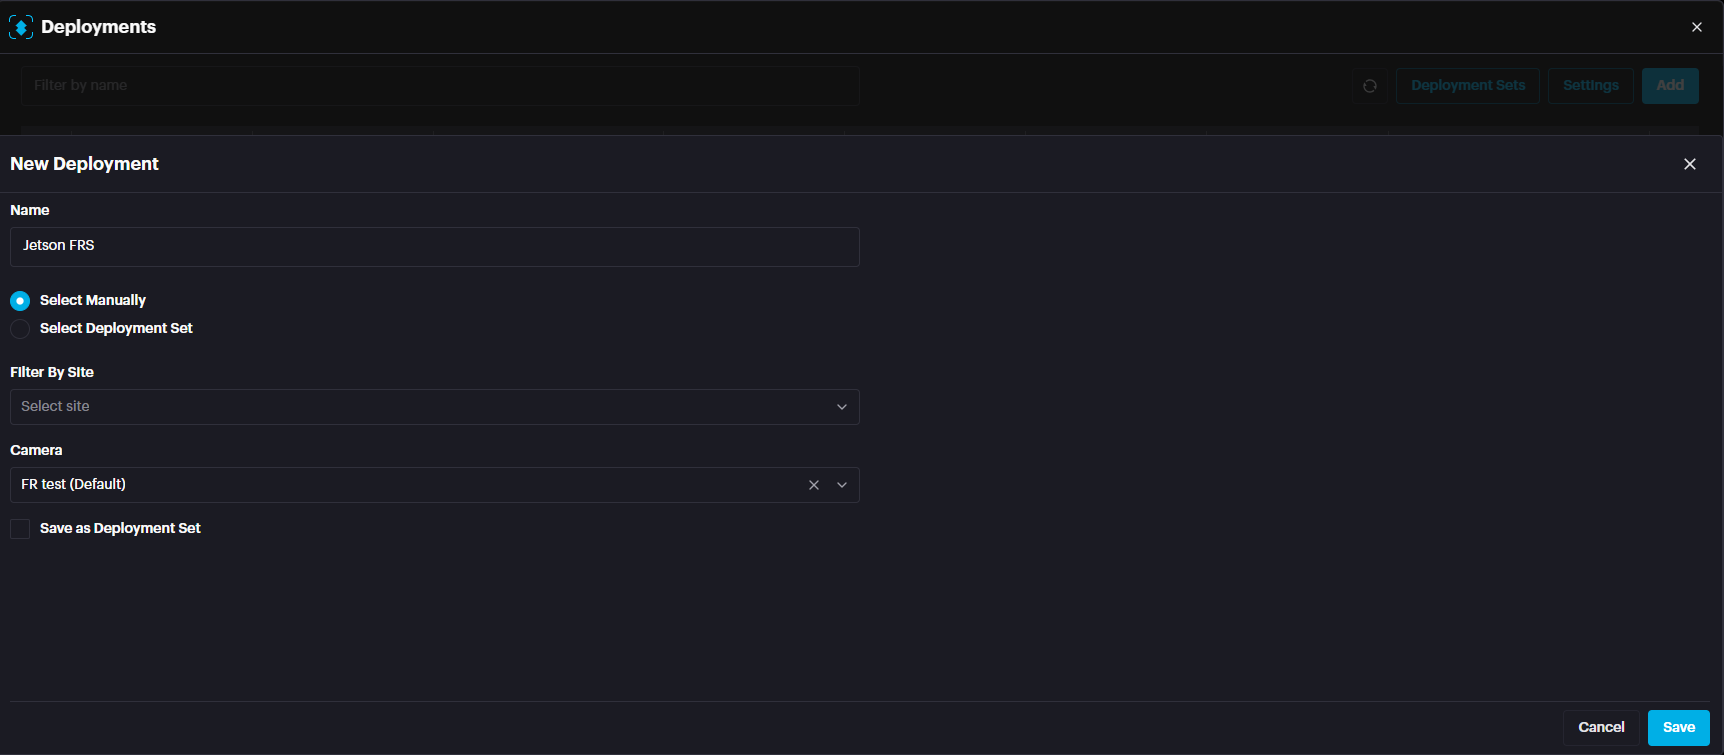
- The deployment status should be Running after clicking the refresh button meaning Face Recognition is running on Jetson. The deployment status should be Running after clicking the refresh button meaning Face Recognition is running on Jetson.

Step 5: Enrolling Faces into the Database
- Access Enrollment Page: Navigate to the Enrolled Faces subpage. Access Enrollment Page: Navigate to the Enrolled Faces subpage.

- Initialize New Entry: Click the Add New button to open the enrollment form.
- Complete Profile Details: Enter the required information for the individual, including:
- First Name and Last Name
- Label
- Other relevant identification fields
- Upload Media: Select and upload the Face Image(s) to be used for recognition.
- Click Save. Initialize New Entry: Click the Add New button to open the enrollment form.
Complete Profile Details: Enter the required information for the individual, including:
- First Name and Last Name
- Label
- Other relevant identification fields First Name and Last Name
Label
Other relevant identification fields
Upload Media: Select and upload the Face Image(s) to be used for recognition.
Click Save.
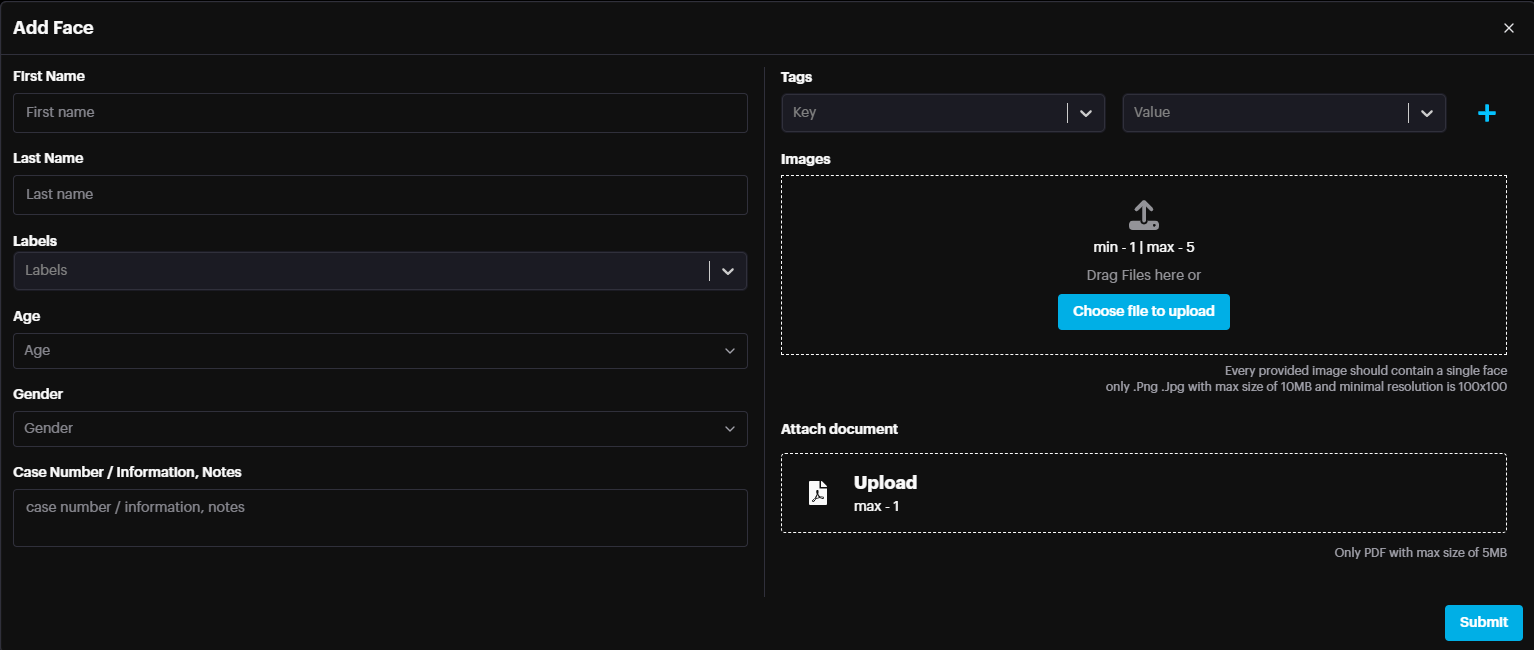
- Once individuals have been added to the database, you can manage how their profiles are displayed on the Enrolled Faces page. Once individuals have been added to the database, you can manage how their profiles are displayed on the Enrolled Faces page.
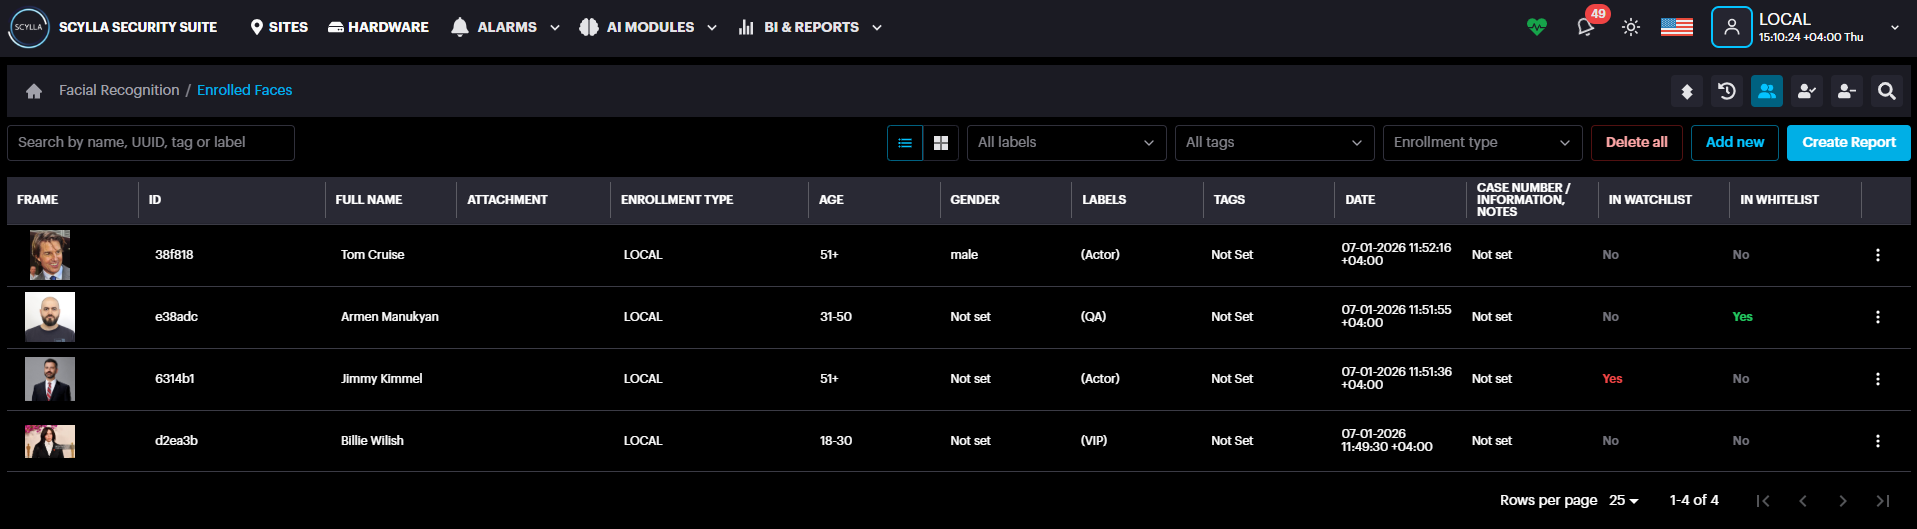
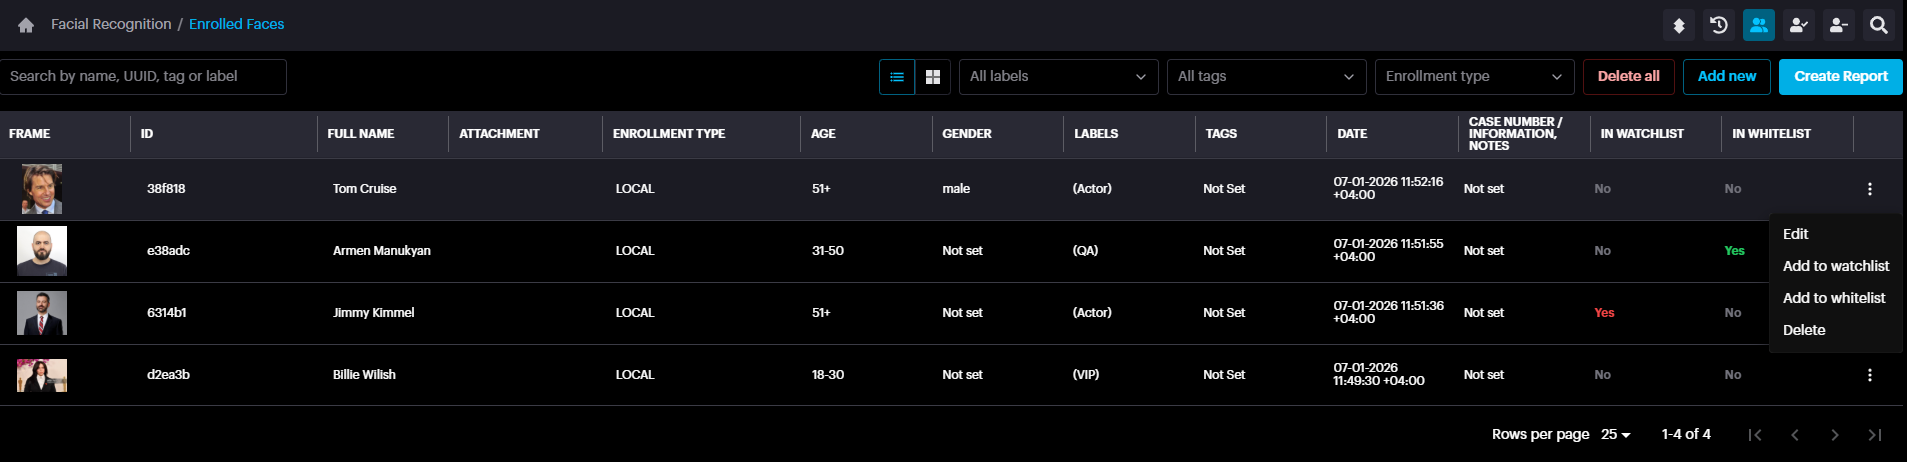
Step 6: Enrolled Faces Page
The Enrolled Faces page displays a database of all faces. You can view the faces in either List View or Grid View.
In Grid View, clicking on a face opens a details panel on the right side. From this panel, you can:
-
Edit face-related information. Edit face-related information.
-
Add the face to the watchlist or whitelist. Watchlist is used to trigger alarm when the face is detected, whitelist can be used for access control or related use cases. Add the face to the watchlist or whitelist. Watchlist is used to trigger alarm when the face is detected, whitelist can be used for access control or related use cases.
-
See detections, which will redirect to the Enrollment Matches page showing only the matches for that specific face. See detections, which will redirect to the Enrollment Matches page showing only the matches for that specific face.
In List View, clicking the three dots for the face record display the options like Edit, Add to watchlist/whitelist
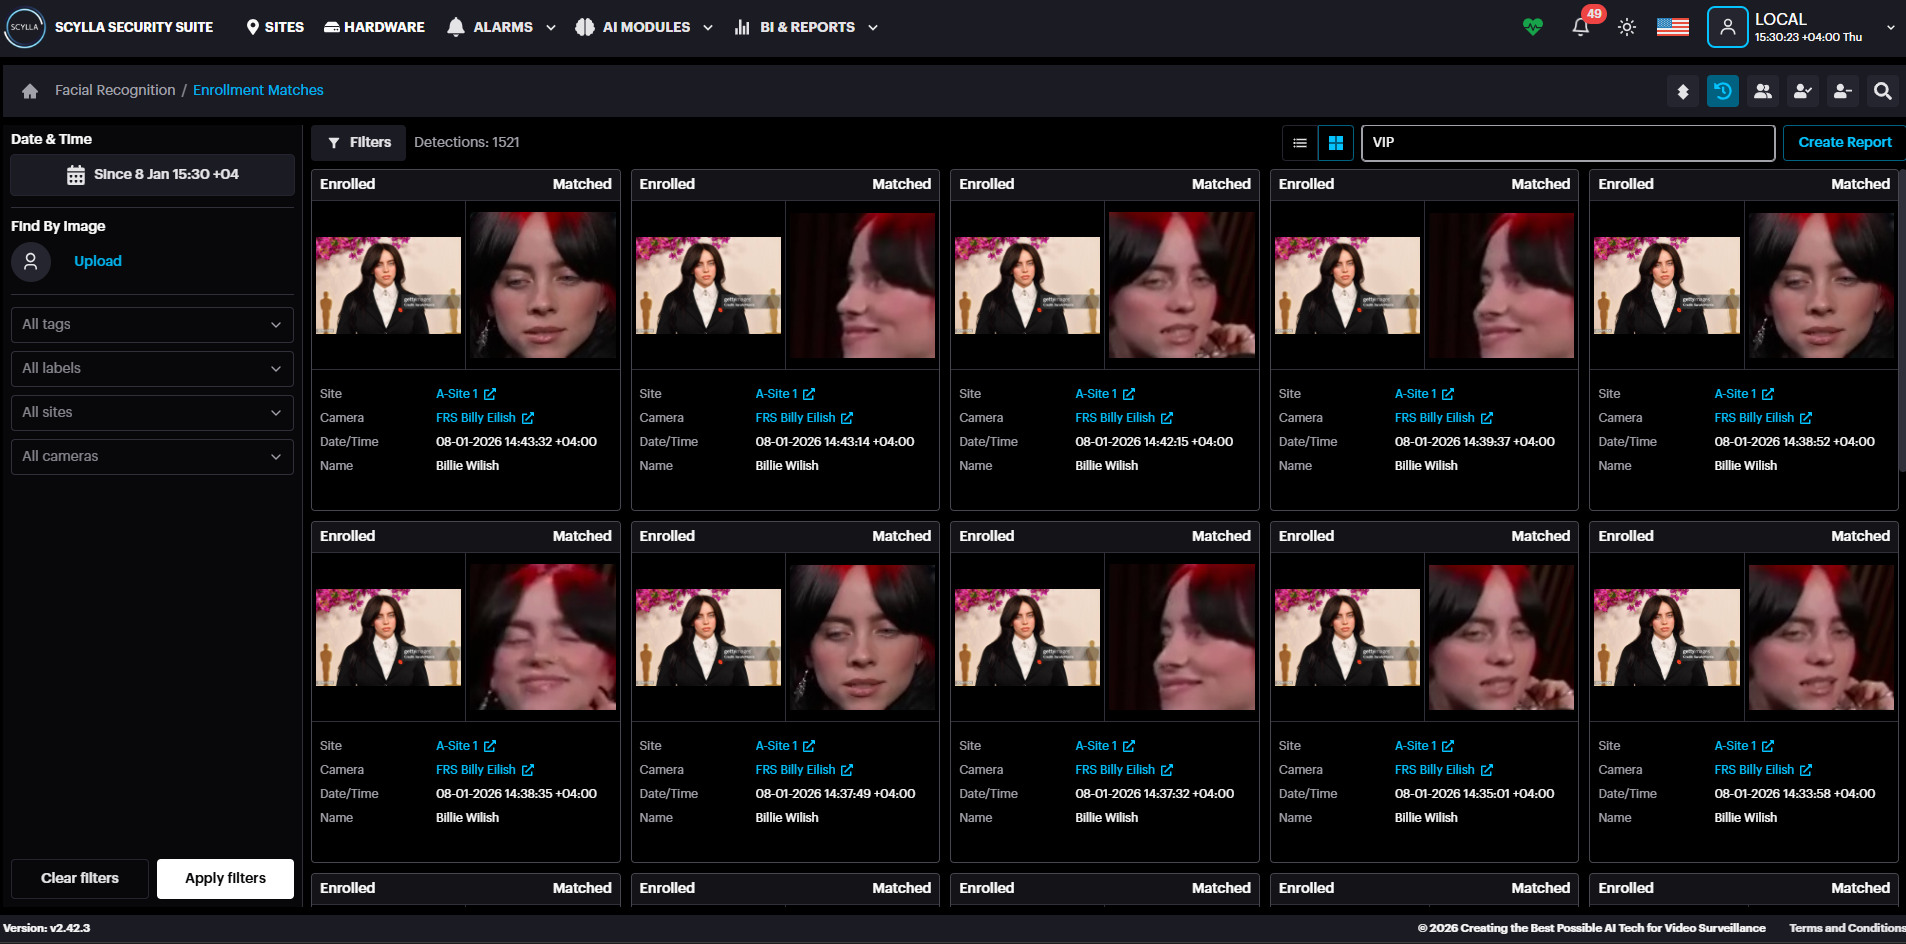
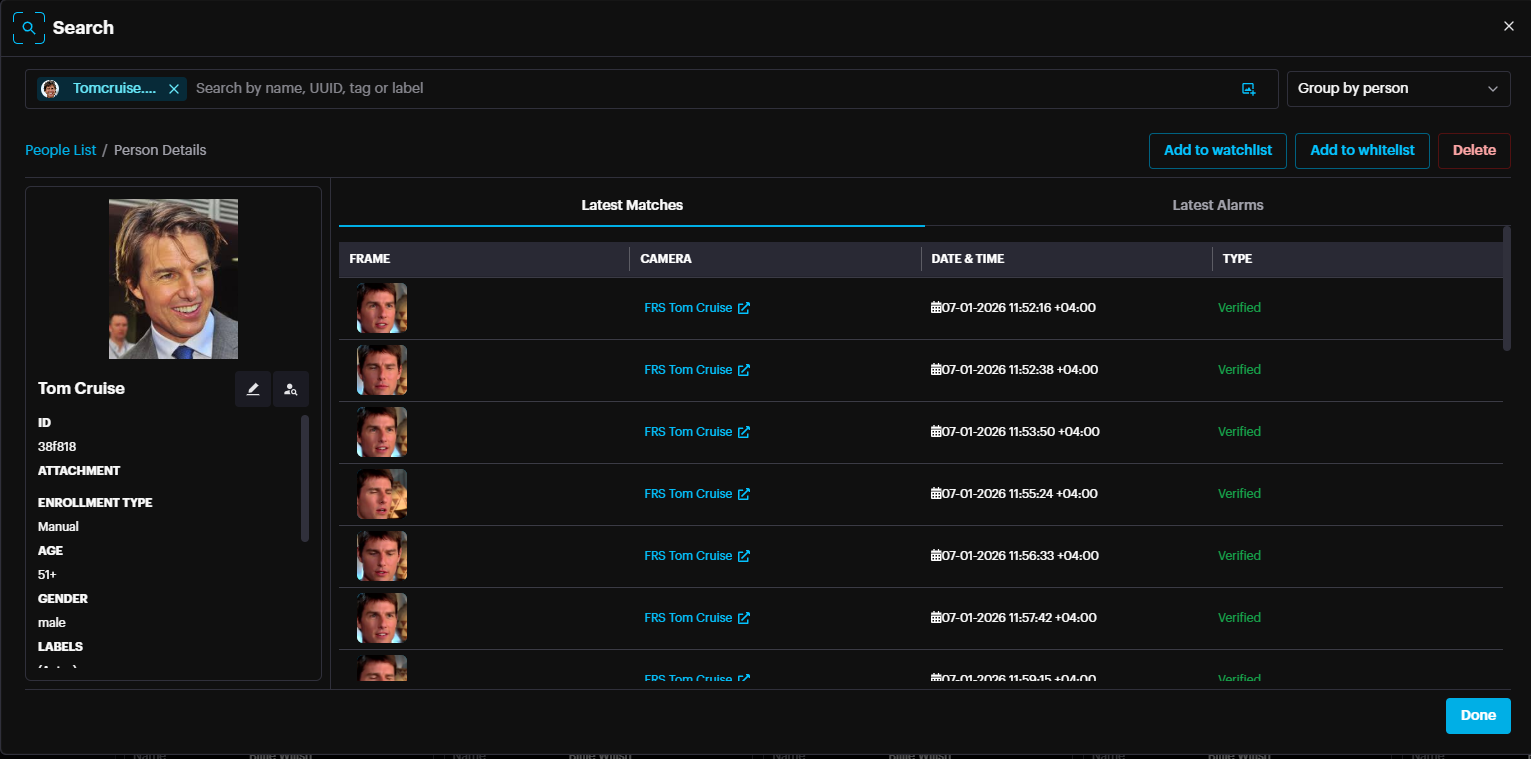
Step 7: Enrollment Matches Page
The Enrollment Matches page displays all matches in a grid view with information such as Site, Camera. Date/time, Name & In watchlist/Whitelist (if true) in real time. A filter panel is available on the left side, allowing you to refine and narrow down the displayed matches.
Options for List View or Grid View.
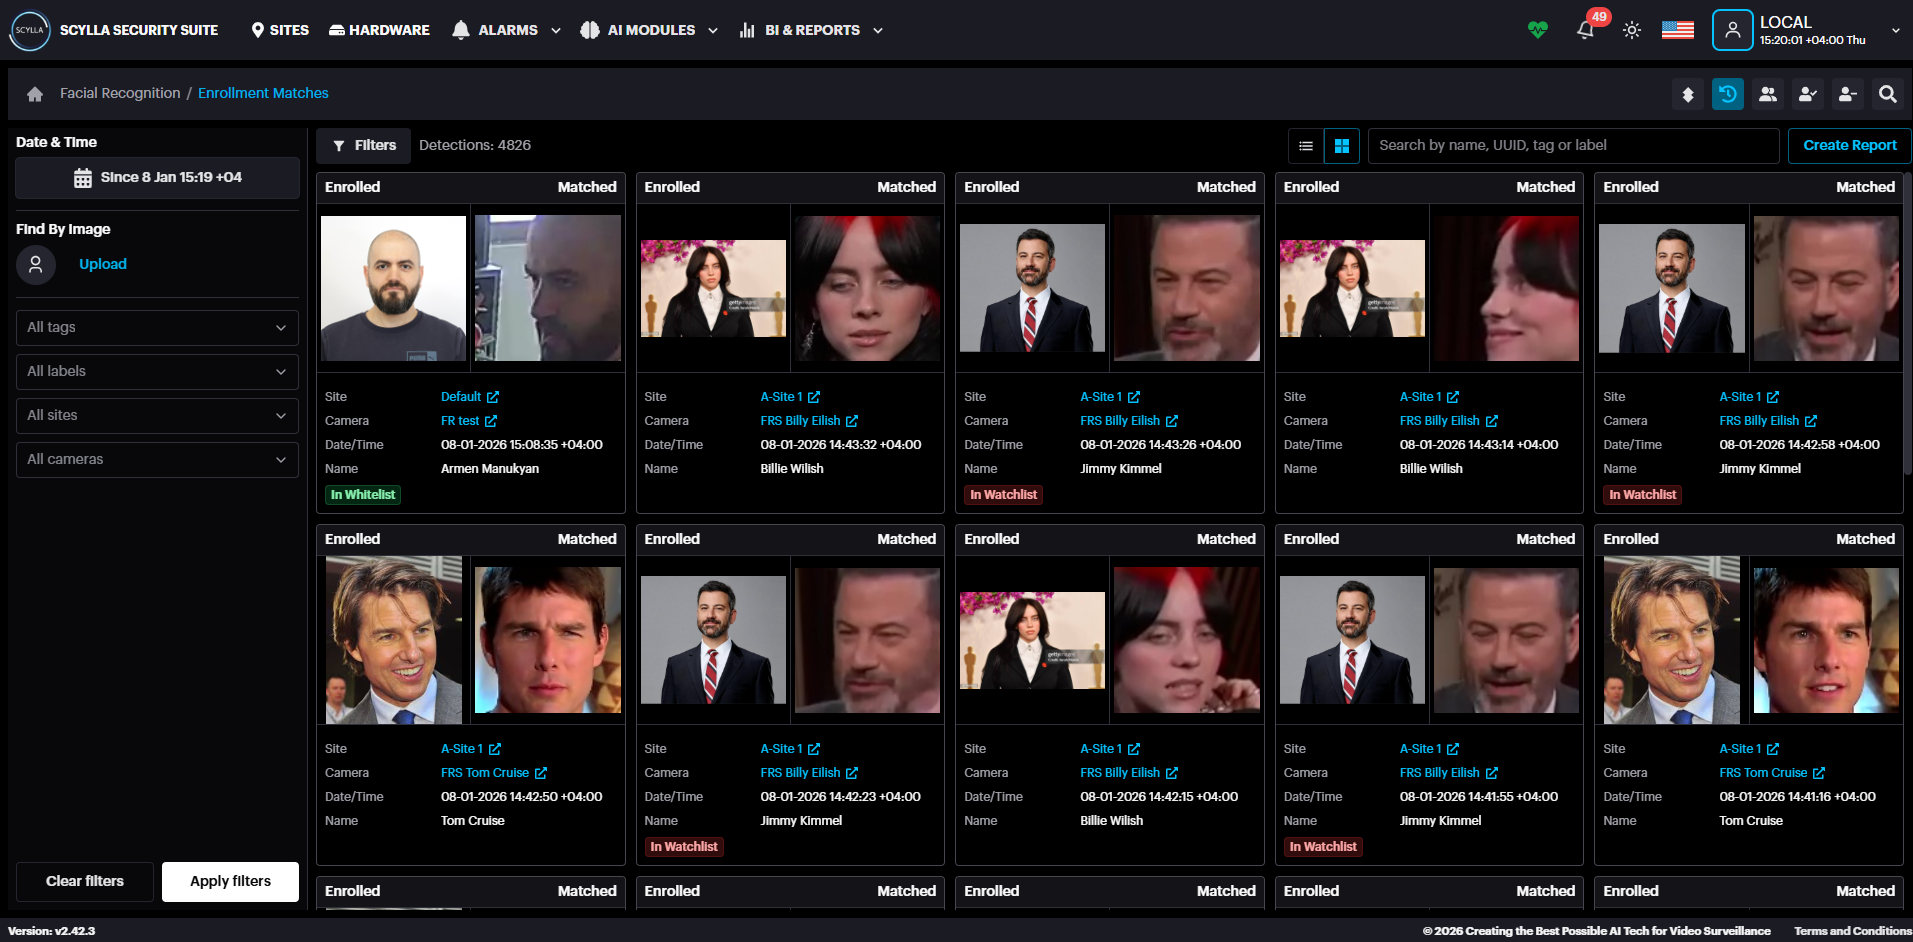
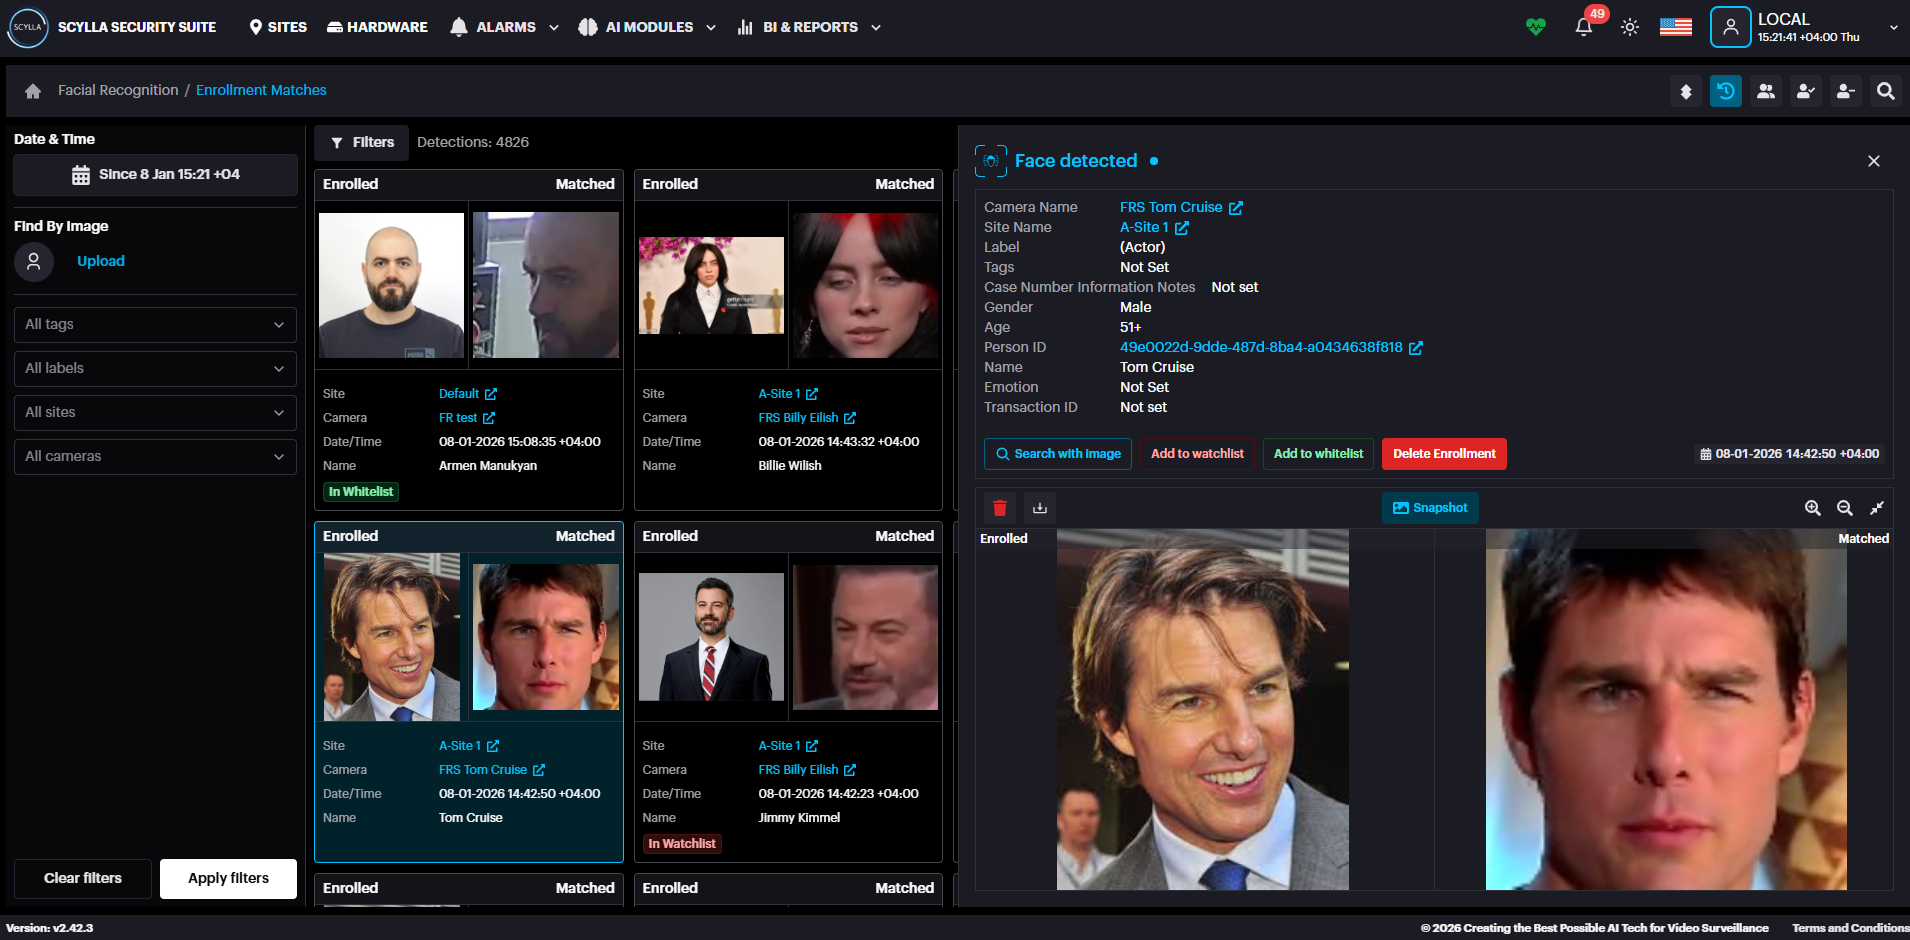
Clicking on a match opens a details panel on the right side of the page. This panel displays additional information about the match, such as name, age, gender, and more.
It also provides quick action buttons:
-
Search with Image – Filters and display all matches for the same face image, allowing you to track every occurrence of that face. Search with Image – Filters and display all matches for the same face image, allowing you to track every occurrence of that face.
-
Add to Watchlist – Adds the face to the watchlist. Add to Watchlist – Adds the face to the watchlist.
-
Add to Whitelist – Adds the face to the whitelist. Add to Whitelist – Adds the face to the whitelist.
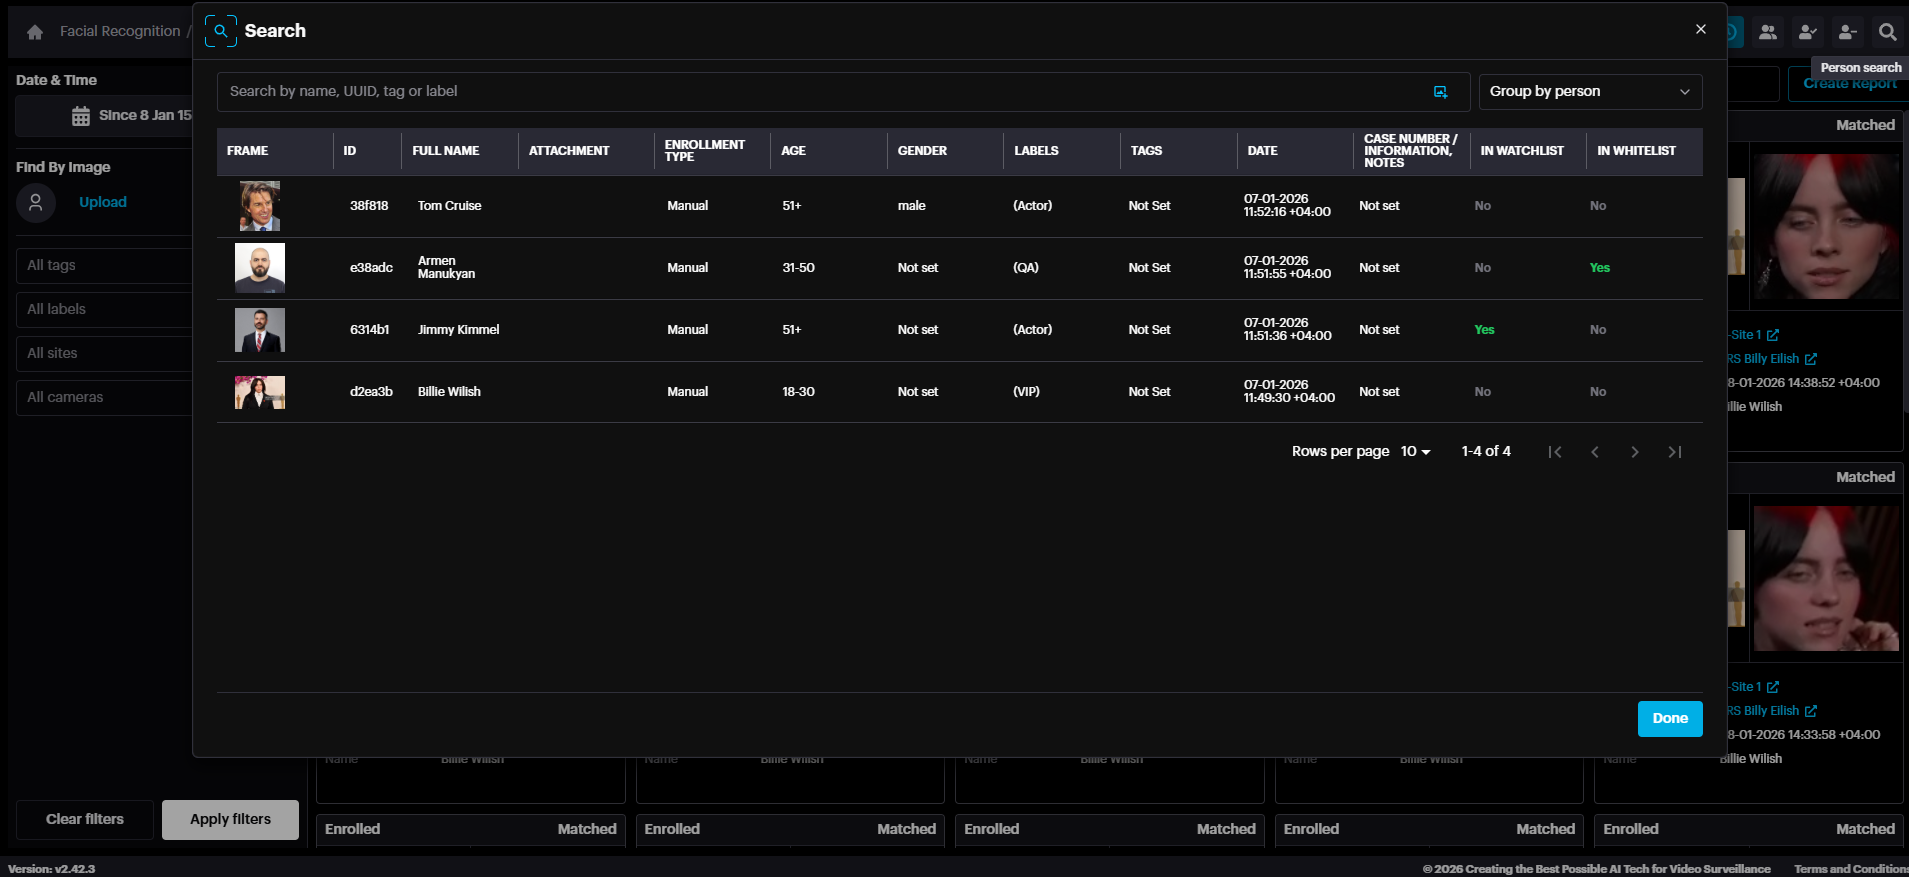
Step 8: Search for Face/Person and Track
You can perform a search using one of the following methods:
- Text-Based Search: Enter the person Name or Label into the search field. Text-Based Search: Enter the person Name or Label into the search field.
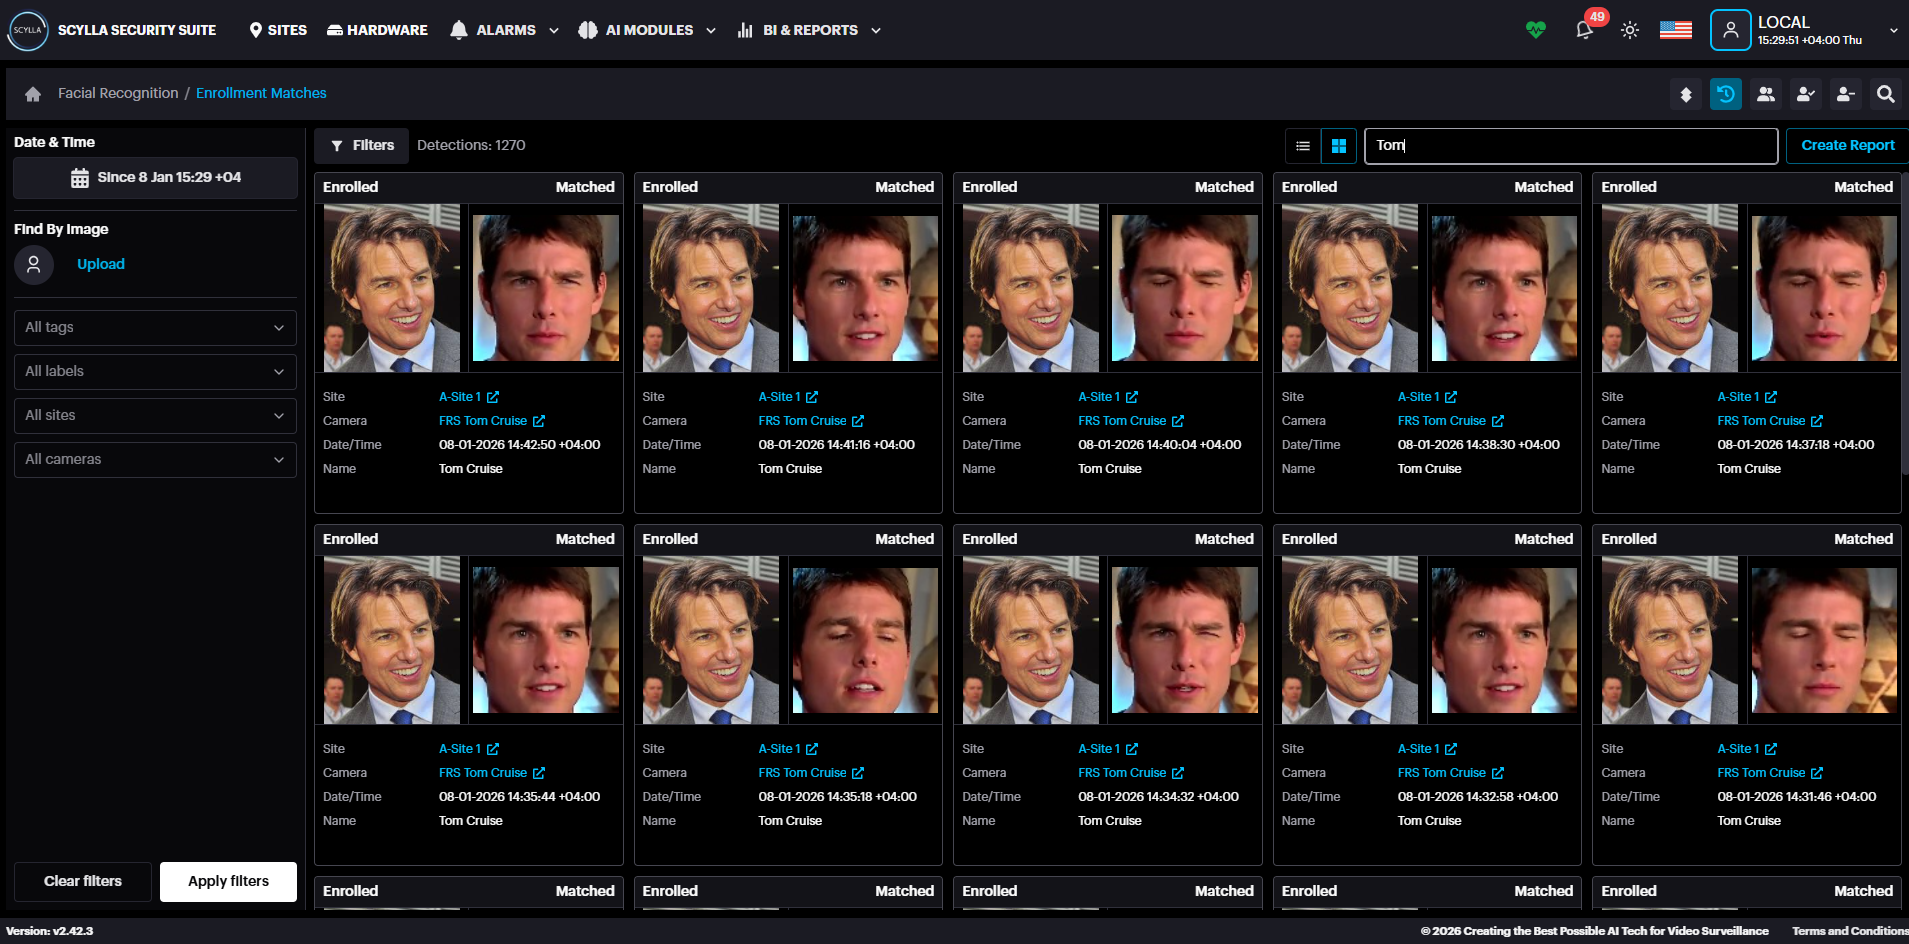
- Visual Search: Upload an Image of the person to initiate a facial recognition based match and find the person with all the detection of the specific person. Visual Search: Upload an Image of the person to initiate a facial recognition based match and find the person with all the detection of the specific person.
Click Add image button and select the image.
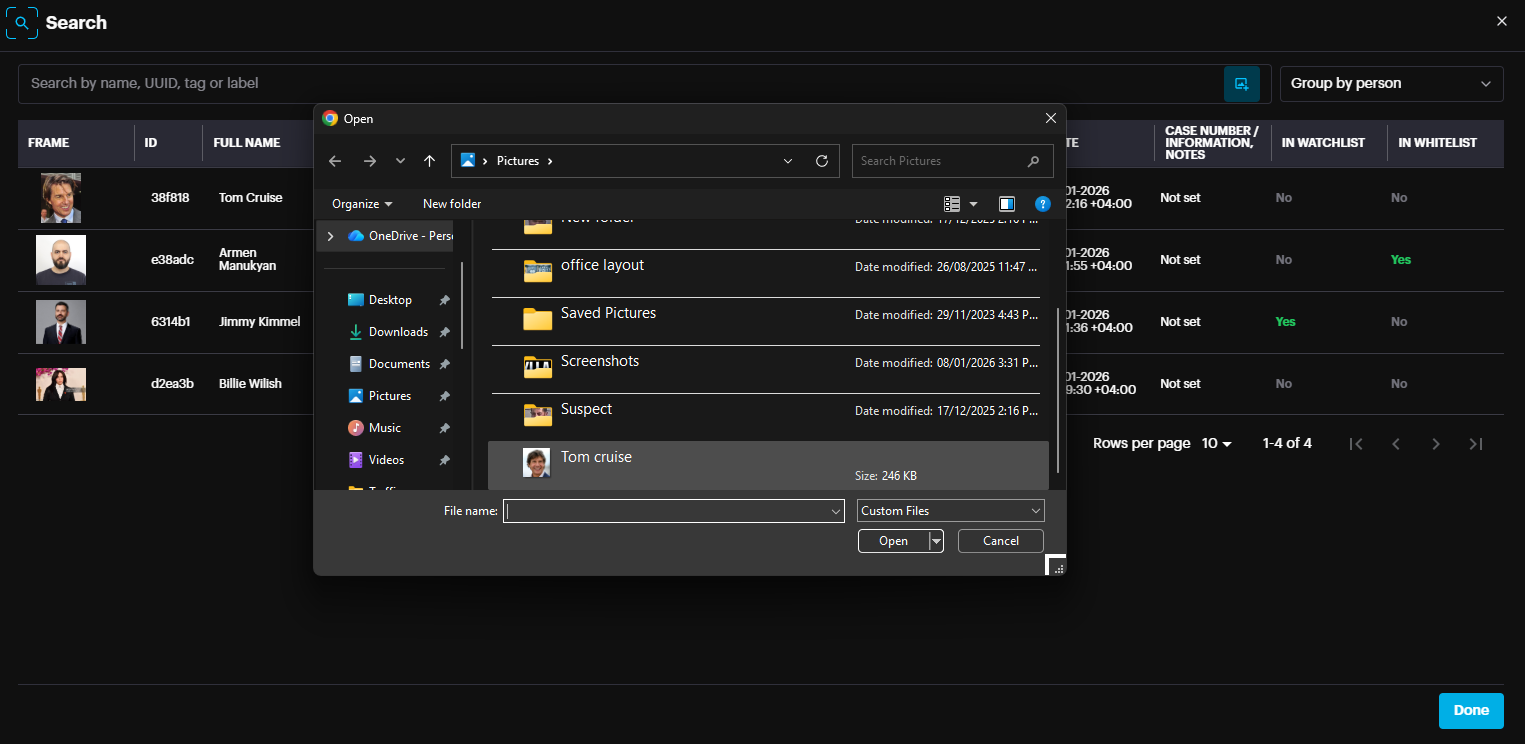
The face recognition module finds the person.
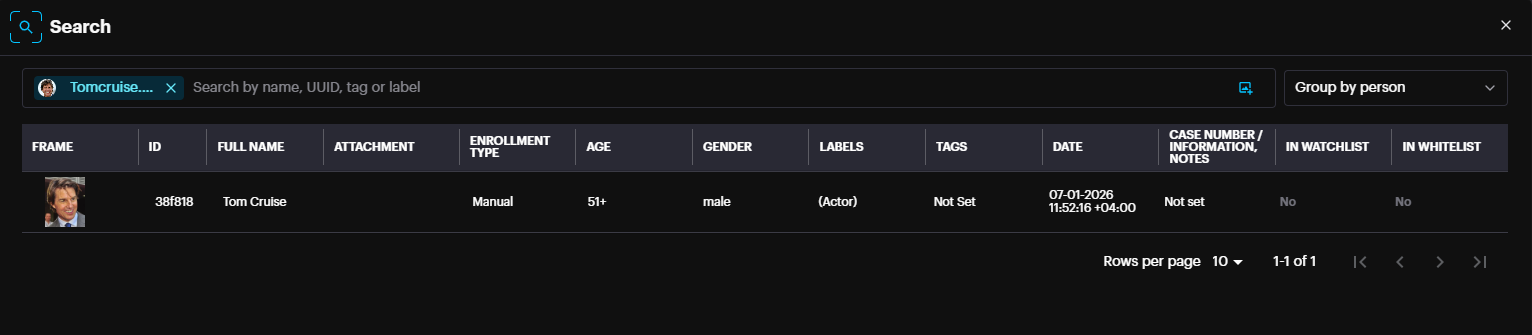
Clicking on the person's record will list all the face detections of this person, on which camera and when etc.
Step 9: Additional Information about Central Dashboard
For further information regarding Dashboard Settings, Integrations, and System Health Checks, please refer to the On-Premises Manual.